Tired of endlessly searching for the perfect lip balm that truly nourishes and soothes your lips without a long list of unpronounceable ingredients? Imagine a lip balm that’s not only deeply conditioning but also leaves a beautiful, subtle gloss, all while smelling absolutely divine. The answer lies in your own kitchen: a homemade honey lavender lip balm. This DIY beauty essential offers the best of both worlds – the intense hydration of a traditional chapstick blended with the appealing sheen of a gloss, making it your go-to for healthy, happy lips year-round.
Crafting your own lip balm is a rewarding experience, giving you complete control over what goes onto your delicate skin. This particular blend harnesses the natural power of honey and the calming essence of lavender, creating a balm that not only addresses dryness but also provides a moment of serene self-care. It's surprisingly simple to make, requiring just a few natural ingredients and a little know-how, ensuring your lips stay soft, supple, and beautifully conditioned, even when life's demands make staying hydrated a challenge.
Why Choose Homemade: The Benefits of DIY Lip Balm
In a world saturated with commercial beauty products, the appeal of going DIY has never been stronger. Making your own homemade honey lavender lip balm isn't just a fun project; it's an investment in your health and well-being, offering unparalleled benefits that store-bought alternatives often can't match.
Beyond the Store Shelf: Purity and Control
One of the primary advantages of creating your own lip balm is the absolute control you gain over the ingredients. Commercial lip balms can often contain synthetic fragrances, petroleum jelly, parabens, and other chemicals that, while perhaps offering a temporary fix, don't truly nourish your lips in the long term. By making your own, you can:
- Ensure Purity: Select high-quality, natural ingredients free from unwanted additives. You know exactly what's going into your balm.
- Customize to Perfection: While this recipe champions honey and lavender, the beauty of DIY is endless customization. Want a different scent? Substitute lavender essential oil with peppermint, sweet orange, or even a touch of vanilla extract (lip-safe varieties). Fancy a subtle tint? Natural mica powders, a tiny bit of beetroot powder, or even cocoa powder can add a lovely hue.
- Save Money: While the initial outlay for ingredients might seem like an investment, the cost per balm is significantly lower than purchasing high-end natural options, especially considering this recipe yields multiple balms.
- Experience Satisfaction: There’s an undeniable joy and pride in using a product you’ve created with your own hands, knowing it’s beneficial for you.
Honey & Lavender: A Power Duo for Your Pout
The star ingredients in this homemade honey lavender lip balm are chosen for their exceptional properties that cater to lip health:
- Honey: Nature's Humectant & Healer: More than just a sweetener, honey is a natural humectant, meaning it draws moisture from the air into your skin, keeping your lips hydrated and plump. Its natural antibacterial and anti-inflammatory properties also make it excellent for soothing and healing chapped or irritated lips.
- Lavender Essential Oil: Calming & Soothing: Renowned for its calming aroma, lavender essential oil also possesses remarkable anti-inflammatory and antiseptic qualities. It's perfect for soothing irritated skin, making your lip balm a truly therapeutic experience. Plus, its delightful floral scent is like a mini-aromatherapy session every time you apply it.
These powerful ingredients are supported by a base of nourishing oils and waxes:
- Coconut Oil: Deeply Moisturizing & Protective: A super moisturizer that forms a protective barrier on the skin, locking in hydration. It's rich in fatty acids, making it incredibly beneficial for dry, chapped lips.
- Jojoba Oil: Mimics Skin's Natural Sebum: Often considered liquid gold, jojoba oil is unique because its molecular structure is very similar to the natural sebum produced by our skin. This means it's readily absorbed, non-greasy, and incredibly nourishing, helping to balance and protect the delicate lip skin.
- Beeswax: Barrier & Consistency: Essential for giving the lip balm its solid structure, beeswax also acts as a natural protective barrier, sealing in moisture and protecting lips from environmental aggressors like wind and cold.
Together, these ingredients create a lip balm that is rich in deep conditioning properties, while leaving behind a beautiful, natural gloss – striking the perfect balance between intense hydration and aesthetic appeal for most of the year.
Crafting Your Own: The Ultimate Homemade Honey Lavender Lip Balm Recipe
Ready to transform simple ingredients into a luxurious lip treatment? This recipe is straightforward, but it includes a crucial step to ensure your homemade honey lavender lip balm is perfectly emulsified and smooth.
Gather Your Natural Ingredients
Before you begin, ensure you have all your ingredients and tools ready. Quality ingredients make a noticeable difference in the final product.
- 2 Tablespoons Coconut Oil (virgin or refined, your preference)
- 2 Tablespoons Jojoba Oil (or other preferred carrier oil like sweet almond)
- 1 Tablespoon + 1 Teaspoon Grated Beeswax (approximately 4 grams). Beeswax pellets can also be used, simply measure by weight.
- 2 Teaspoons Honey (local, raw honey is wonderful for its extra beneficial compounds)
- 10 drops Lavender Essential Oil (ensure it's therapeutic grade for skin application; adjust amount to your scent preference)
- Small saucepan
- Heat-proof spatula or whisk
- Large bowl for an ice bath
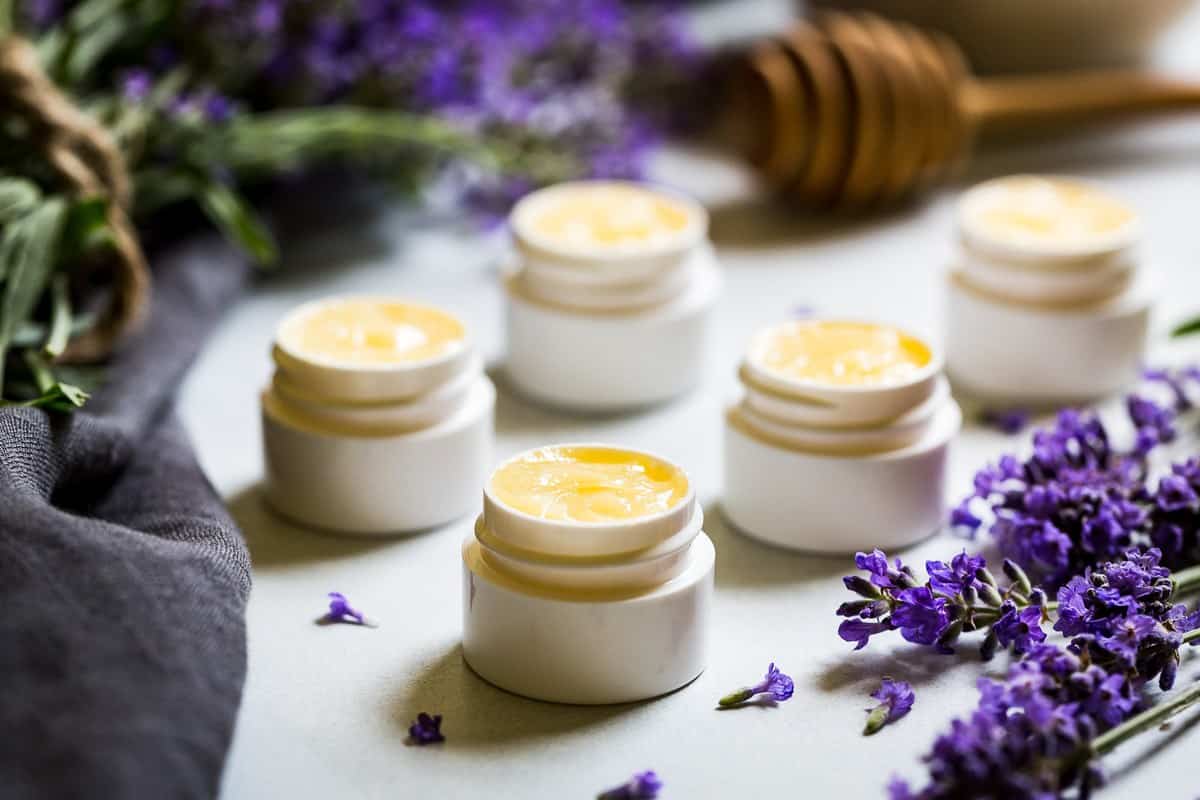
- Small lip balm containers (tins or small pots, about 1" wide by 1" deep are ideal as the balm will be spooned in)
Step-by-Step DIY Guide
Follow these steps carefully, paying special attention to the emulsification process for a flawless balm.
- Melt the Base: In your small saucepan, combine the coconut oil, jojoba oil, beeswax, and honey. Place the saucepan over medium heat, stirring gently and continuously until the beeswax has completely liquified and all ingredients are smoothly blended.
- Infuse with Lavender: Once everything is melted and uniform, remove the saucepan from the heat. Stir in the lavender essential oil. Give it a good mix to ensure the oil is evenly distributed.
- The Crucial Emulsification Step (The Ice Bath Secret!): This is where the magic happens, especially due to the honey content. Prepare a large bowl with 2-3 cups of ice cubes and fill it halfway with cold water. Place your saucepan containing the melted lip balm mixture directly into this ice bath. Now, here's the key: stir vigorously and continuously with your spatula or whisk. Keep stirring as the mixture begins to cool and thicken. You'll notice it transforming from a liquid to a thick, creamy consistency, similar to a soft butter or thick pudding. The goal is for it to be thick but still spoonable, not solid. This vigorous stirring over cold ensures the honey fully emulsifies into the oils and wax, preventing separation into distinct layers. For a deeper dive into this technique, check out our guide: Master Homemade Honey Lavender Lip Balm: The Ice Bath Secret.
- Portion into Containers: Once the lip balm mixture has achieved that thick, emulsified consistency, immediately remove it from the ice bath. Spoon the thickened balm into your chosen small containers. Since it's no longer liquid, pouring into traditional chapstick tubes won't work effectively; small pots or tins are best. This recipe typically yields 6-8 small lip balms.
- Set and Store: Allow the balms to cool completely at room temperature until they are fully solid. Once solid, they are ready to use! These homemade balms will keep well for approximately 4-6 weeks due to their natural ingredients and lack of synthetic preservatives.
Tips for Success & Customization
- Don't Rush the Ice Bath: Patience and vigorous stirring are paramount for emulsification. If you find your balm solidifies too much in the ice bath, simply remove it and let it warm slightly until it's spoonable again.
- Essential Oil Variations: While lavender is delightful, feel free to experiment with other lip-safe essential oils like peppermint for a tingly sensation, sweet orange for an uplifting aroma, or even a blend of vanilla and a hint of cinnamon for a warming effect. Always ensure essential oils are suitable for skin application and used in appropriate dilutions.
- Adding a Natural Tint: For a touch of color, stir in a tiny pinch of cosmetic-grade mica powder (pink, red, or bronze) or a dash of beetroot powder (for a pinkish hue) into the melted mixture before the ice bath step.
- Gifting Your Creations: Homemade honey lavender lip balm makes wonderful, thoughtful gifts. Package them in pretty tins, add custom labels, and tie them with a ribbon for a personalized touch.
Troubleshooting Your Homemade Lip Balm
Even with the clearest instructions, sometimes things don't go exactly as planned. Here are some common issues you might encounter when making your homemade honey lavender lip balm and how to troubleshoot them.
Common Issues and How to Fix Them
- Separation (Honey Layer at the Bottom): This is the most common issue if the ice bath step isn't performed correctly. If your balm separates into a waxy layer and a honey layer, it means the honey didn't emulsify.
- Fix: Gently remelt the separated balm in your saucepan over low heat until fully liquid again. Immediately place it back into a fresh ice bath and stir much more vigorously and consistently until it thickens to the proper consistency.
- Lip Balm is Too Soft: If your balm melts too easily or feels too oily.
- Fix: This usually means there isn't enough beeswax. Remelt your balm, and add another ½ to 1 teaspoon of grated beeswax. Stir until fully melted, then proceed with the ice bath step again.
- Lip Balm is Too Hard/Waxy: If your balm is difficult to apply or feels overly stiff.
- Fix: Too much beeswax. Remelt the balm and add another ½ to 1 teaspoon of your liquid carrier oil (coconut or jojoba oil). Stir until fully melted, then re-emulsify over an ice bath.
- Gritty Texture: This can happen if the beeswax or honey didn't fully melt or if the mixture cooled too quickly without proper stirring.
- Fix: Remelt the balm until it's a smooth liquid. Ensure all solid particles are dissolved. Then, proceed with the ice bath, stirring consistently and not allowing it to solidify unevenly.
- Scent is Too Weak or Too Strong: Essential oil preference is highly personal.
- Fix: If too weak, you can gently remelt the balm (if it hasn't separated), add a few more drops of lavender essential oil, stir well, and then re-emulsify. If too strong, unfortunately, this is harder to fix. Next time, start with fewer drops and add more gradually.
Embracing the DIY approach to beauty products, especially something as frequently used as lip balm, is a deeply satisfying journey towards natural self-care. This homemade honey lavender lip balm recipe transcends basic lip care, offering a luxurious, deeply hydrating, and naturally soothing experience that pampers your lips with every application. By choosing natural ingredients and mastering a simple technique, you gain not only soft, beautiful lips but also the peace of mind that comes from knowing exactly what you're putting on your body. So, gather your ingredients, follow these steps, and prepare to indulge in the sweet, calming embrace of your very own handmade honey lavender creation. Your lips will thank you!
